

Arduino Lesson 4
4. Analog Write
Turn LED on/off from the input from an actuator
Components Required

Buy
Introduction
In this example, you are learning how to turn on and off a LED or any other actuator which can be controlled by a digital output such as relay, bulb, motor.
Learning Outcomes
From this example, you’ll get an understanding about,
- Pulse Width Modulation
- Analog Write
Theory
To change the brightness of a LED, we could change the voltage the LED is supplied with. But in a microcontroller, the ability to change the voltage (converting a digital number to an analog voltage) is limited, so a method called PWM (Pulse Width Modulation) is used. What this does, is pulsing on and off the pin at a high frequency. The length of the pulses creates the perception of brightness.
Duty cycle is a term used to describe the ratio between on and off times.
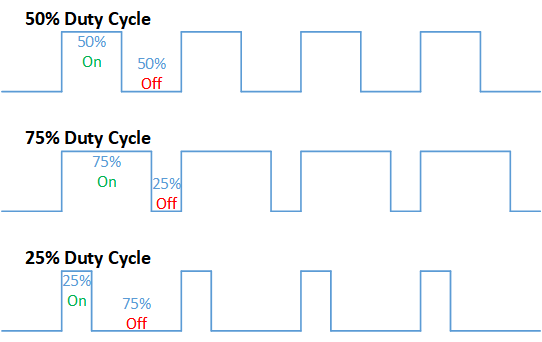
In this example, the higher Duty cycle gives higher brightness & the low duty cycle gives lower brightness.
Methodology
Let’s select green LED (which is wired to D16). We will use a for loop to generate the duty cycle (0 – 0% duty, 255-100% duty). And also to generate 255 cycles.
Code
#include

void setup(){
      pinMode(16,OUTPUT);
}
void loop(){
      for(int i = 0; i < 256; i++){
      analogWrite(16, i);
      delay(10);
}
Explanation
for(int i=0; i<256; i++): There are 3 parameters in a for loop, the first parameter we are defining a variable to store the value generated by the for a loop. The second parameter specifies the condition that needs to be true to run the for loop(else it breaks out from the loop). The third parameter specifies the change that happens to the variable in each cycle, in this case, 1, added to i.
analogWrite(pin number, PWM value): You can input the pin number you need to do PWM and then the PWM value you need to give to that pin. This assigns the corresponding duty cycle to the pin.
Note This example we have coded to increase the brightness, write a code to do the opposite of that, to fade the brightness of the LED, & put both effects together to create a beautiful fade & light-up effect.