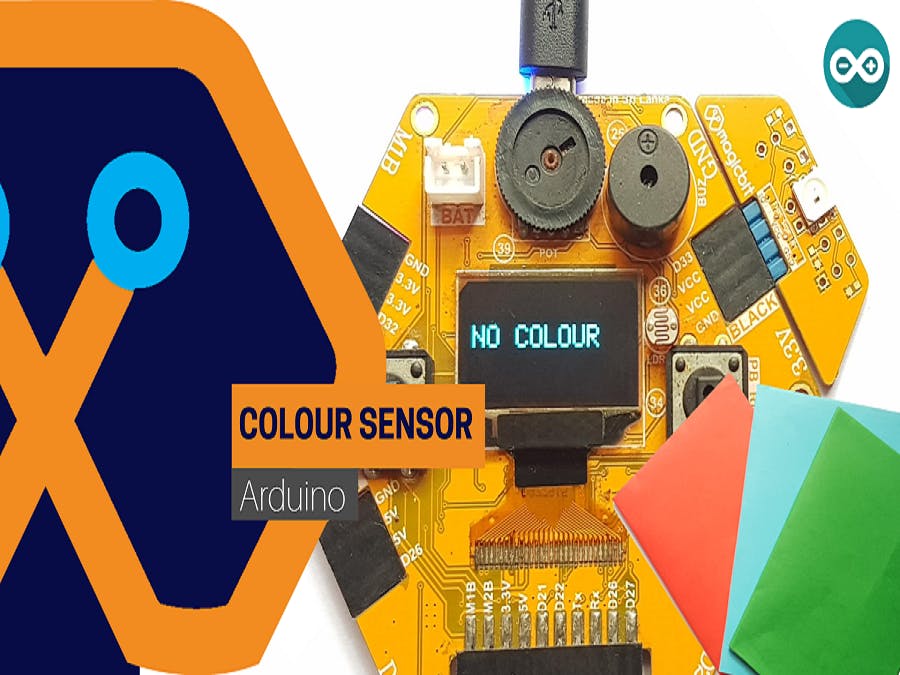
Simple DIY Colour Sensor From Magicbit
Make a simple color sensor using Magicbit with Arduino
Components Required


Story
Hi guys, at some times you have to use color sensors for some purposes. But may be you don’t know how they are works. So In this tutorial you will learn about how to make a simple DIY Colour Sensor using Magicbit with Arduino. Lets get start.
Theory and Methodology
In this project we expect to teach you to build color sensor which can detect red, green and blue colors. This is very basic example. So how to do this. For this purpose we use RGB module of the Magicbit and inbuilt LDR. First of all you have to learn about some theory. that is about light reflection amount. Now I am asking question from you. what colored surface which most reflect red color light ?also what surfaces which mostly reflect Green and Blue lights. Think little bit. But the answer is simple. The Red colored surface mostly reflect red color light. Also green and blue surfaces will reflect green and blue lights. So in this project we use that theory. To recognize color we emits red, green and blue lights one by one. At every time we measure reflection amount by using LDR value.if some light will give most reflection than other two lights, then that surface should be mostly reflected colored surface.
Hardware setup
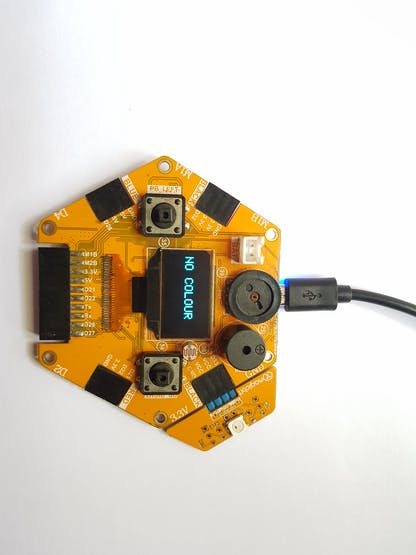
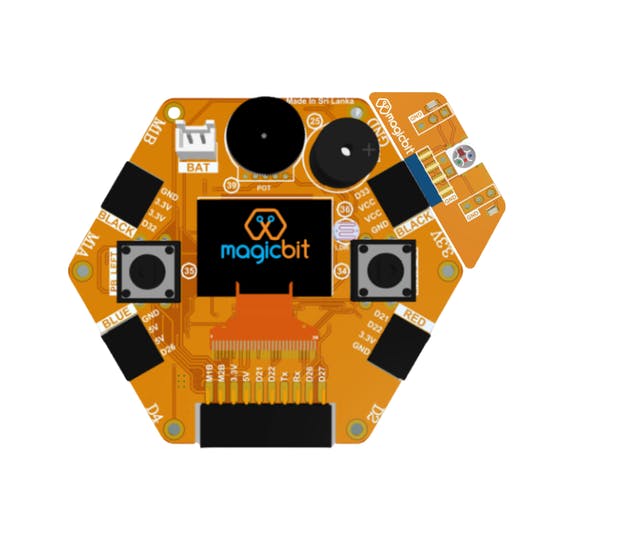
This very simple. Plug your RGB module into upper right port of Magicbit. This module have WS2812B Neopixel LED. This LED have 4 pins. Two for power and two for Data in and out. Because we use one led we only need power pins and data in pin. If you don’t have that module you can buy and Neopixel module. If you bought that kind of module you have to connect power pins and data in pin to Magicbit. That is very easy. connect VCC and GND of the Magicbit to power pins of RGB module and D33 pin to data pin.
Software setup
The most part done by the programming. We use Arduino IDE to program our Magicbit. In the code we use couple of libraries. They are Adafruit Neopixel library for control Neopixel LED and Adafruit OLED library for handle OLED. In the setup we configure our inputs and outputs. also configure the inbuilt OLED display on Magicbit. In the loop we check the left hand push button is pressed or not of the Magicbit. If it pressed, the input signal is 0. Because it is already pulled up by the board. If it pressed then we do color checking. If not then the screen will display “no color” statement. when button is pressed then automatically turn on red, green and blue lights one by one and store the reflection amount of the colors into three variables. Next we compared those values and select maximum value color to display as the output color.
So connect micro USB cable to Magicbit and select board type and com ports correctly. Now upload the code. Then it’s time to test our sensor. To test that, keep red, green or blue surfaced paper or sheet top on the LDR and RGB module and press left push button. Then OLED display will show the what is the color of the surface. If that wrong the reason is some color have high light intensity. As a example in every green surface the output is red then you have to reduced red light brightness from some amount. Because the red light have very high brightness in that case. So it have have high reflection. if you don’t know how to how to control brightness, then refer tutorial in link below.
https://magicbit-arduino.readthedocs.io/en/latest/
In this link you can find how to control that RGB module from Magicbit. And also you ca find how to work with LDR and push button using Magicbit. Read that document and study further how to improve color sensor. Because this is very basic example about how color sensors are working. Most type of color sensors work in this way. So try to improve this by removing the ambient light noise and other noises.
CODE
If you need help or couldn’t understand a step be sure to check out our youtube video by clicking here: Youtube Video
#include <Adafruit_NeoPixel.h>
#define LED_PIN 33
#define LED_COUNT 1
Adafruit_NeoPixel pixels = Adafruit_NeoPixel(LED_COUNT, LED_PIN, NEO_GRB + NEO_KHZ800);
#include <Wire.h>
#include <Adafruit_GFX.h>
#include <Adafruit_SSD1306.h>
#define OLED_RESET 4


Adafruit_SSD1306 display(128, 64);
#define LDR 36
#define Button 35
int R_value, G_value, B_value;

void setup() {
  pixels.begin();
  pixels.show();
  pinMode(LDR, INPUT);
  pinMode(Button, INPUT);
  display.begin(SSD1306_SWITCHCAPVCC, 0x3C);
  display.display();
  delay(2000);
  display.clearDisplay();
  Serial.begin(9600);
}

void loop() {
  if (digitalRead(Button) == 0) {  // if button is pressed

    pixels.setPixelColor(0, pixels.Color(50, 0, 0));  //on greencolour
    pixels.show();
    delay(100);
    R_value = analogRead(LDR);  //get red mount

    pixels.setPixelColor(0, pixels.Color(0, 255, 0));  //on redcolour
    pixels.show();
    delay(100);
    G_value = analogRead(LDR);  //get green mount

    pixels.setPixelColor(0, pixels.Color(0, 0, 255));  //on bluecolour
    pixels.show();
    delay(100);
    B_value = analogRead(LDR);  //get blue mount

    if (R_value > G_value && R_value > B_value) {  //red is most reflected
      Display("RED", 3);

    } else if (G_value > R_value && G_value > B_value) {  //green is most reflected
      Display("GREEN", 3);
    } else if (B_value > R_value && B_value > G_value) {  //blue is most reflected
      Display("BLUE", 3);
    }
    Serial.print("RED=");
    Serial.print(R_value);
    Serial.print(" GREEN=");
    Serial.print(G_value);
    Serial.print(" BLUE=");
    Serial.println(B_value);

  } else {
    pixels.setPixelColor(0, pixels.Color(0, 0, 0));  //off RGB
    pixels.show();
    Display("NO COLOUR", 2);
  }
}
void Display(String commond, int size) {  // display data
  display.clearDisplay();

  display.setTextSize(size);    // Normal 1:1 pixel scale
  display.setTextColor(WHITE);  // Draw white text
  display.setCursor(0, 20);     // Start at top-left corner
  display.println(commond);
  display.display();
}