
Changing brightness of an LED
Change brightness of LED by using PWM pins.
Components Required

Introduction
Learning Outcomes
From this example, you’ll get an understanding about,
- IF-ELSE conditions
- Variables
Theory
To change the brightness of an LED, we could change the voltage the LED is supplied with. But in a microcontroller, the ability to change the voltage (converting a digital number to an analog voltage) is limited, so a method called PWM (Pulse Width Modulation) is used. What this does, is pulsing on and off the pin at a high frequency. The length of the pulses creates the perception of brightness.
Duty cycle is a term used to describe the ratio between on and off times.
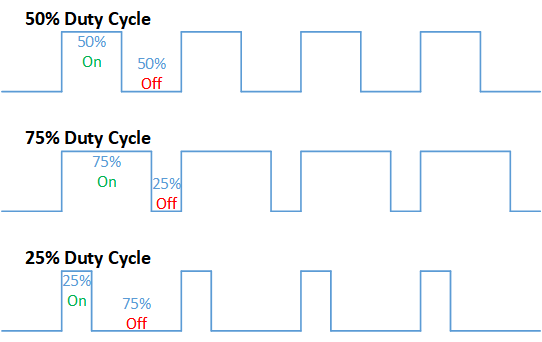
In this example, a higher Duty cycle gives higher brightness & the lower duty cycle gives lower brightness.
Methodology
Let us select green LED (which is wired to D16). Drag and drop the following control, operators, variables, and MagicBit blocks from the block palate and make the following scripts.
Script
Explanation
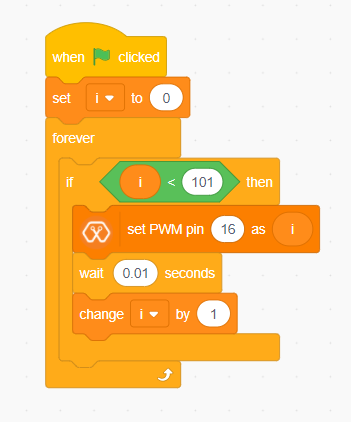
This program starts by clicking the green flag. In this example, the ‘my variable’ block in the variables block set has been renamed as ‘i’. Then, using the ‘set [Variable] to [value]’ block, variable ‘i’ is initializing to zero. The forever block continuously runs the code held inside the block. Duty cycle is represented as a percentage (0 — 0% duty, 255-100% duty) in ‘Set PWM pin [pin] as [Duty cycle]’ block. In the script, a conditional block is used to stop the duty cycle at 100%. By using the ‘Change [variable] by [increment value]’ block, variable ‘ i’ is incremented by 1.
This script increases the brightness of the LED smoothly with increments of the duty cycle and when the duty cycle reaches 100% the LED stays at its maximum brightness.
Note: In this example, we have coded to increase the brightness, write a code to do the opposite of that, to fade the brightness of the LED, & put both effects together to create a beautiful fade & light-up effect.